


thymeleaf
thymeleaf是Java流行的服务端渲染模版引擎1. 前言
这是应广大同学要求同步的历史文档,注意时效性,有时间我会更新成新版。
24年还在更新!新补充的内容都在最后面,最近更新 thymeleaf-layout-dialect
现在市面上大部分的Web教程都是SpringBoot和Vue或者React的前后端分离的教程,但是很多的朋友都会遇到这样一种情况,就是去公司以后,还是会遇到这种混合模板开发的项目,甚至还要维护一些Jsp的老项目,这种情况就很头痛,很多人就会吐槽啊 2021年啦,还在用混合开发,其实技术是为业务服务的,有些项目有些情况就适合用混合开发,没得说的。
所以我最近的实战项目的Pc端使用Thymeleaf来构建,也算是用苦良心吧,但是直接实战,很多小伙伴没用过模板引擎,今天算是一个加餐篇,给大家带来一个Thymeleaf的快速入门教程 打个良心到公屏上!
1.1 为什么是Thymeleaf
目前Java比较流行的模板引擎有Thymeleaf和Freemarker,Thymeleaf的话更适合当前的人员分工问题,回忆一下以前的Jsp页面,必须要动态渲染才能看到真实的效果,写页面的和写后端的分工不太明确
Thymeleaf是动静分离的,页面中的动态标签是需要传递有数据的时候才会渲染,不然就是原本默认的静态的样子
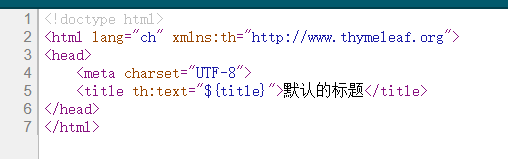
举一个例子th:text="${title}"是一个动态标签,当传递了title这个数据,页面就会渲染这个标签,如果没有传递这个参数,就会显示原本的网页结构<title>默认的标题</title>,所以开发静态页面的时候的是前端工程师完全可以独立进行的
<html lang="ch" xmlns:th="http://www.thymeleaf.org">
<head>
   <title th:text="${title}">默认的标题</title>
</head>
</html>
thymeleaf的语法和vue是有点类似的,很容易上手,下面就跟着我快速入门吧!
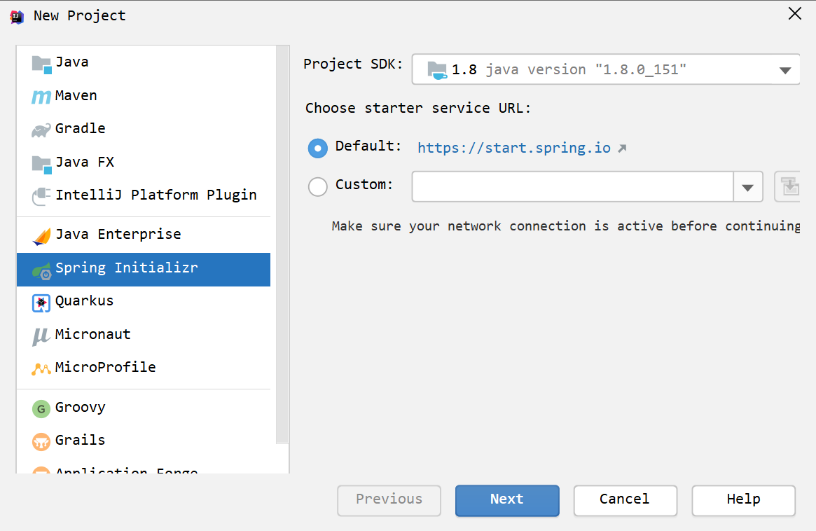
2. 创建项目
直接创建一个springboot的模板项目就行了
需要引入的依赖文件
<dependency>
    <groupId>org.springframework.boot</groupId>
    <artifactId>spring-boot-starter-thymeleaf</artifactId>
</dependency>
<dependency>
    <groupId>org.springframework.boot</groupId>
    <artifactId>spring-boot-starter-web</artifactId>
</dependency>
<dependency>
    <groupId>org.projectlombok</groupId>
    <artifactId>lombok</artifactId>
    <optional>true</optional>
</dependency>
2.1 开启自动编译
首先开发模式禁用页面缓存application.yml
server:
  port: 8001
spring:
  thymeleaf:
    cache: false
然后修改一下运行配置
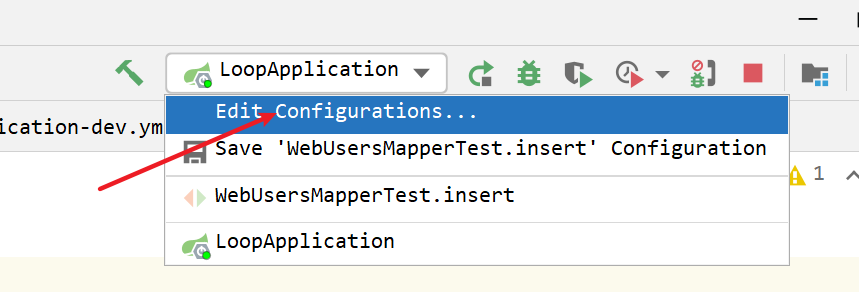
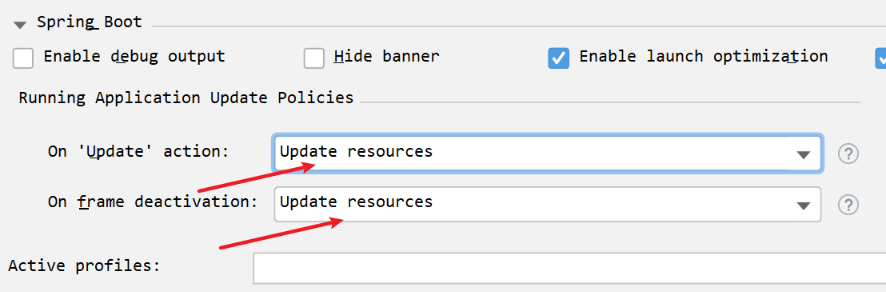
此时我们修改了页面文件后,直接刷新就能看到效果了
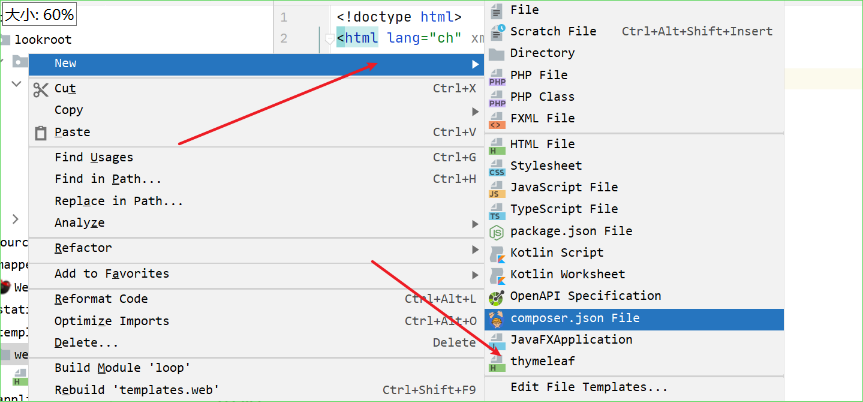
2.2 创建IDEA的模板
我们可以给IDEA创建一个页面模板,这样每次创建页面文件就带上基本的结构了
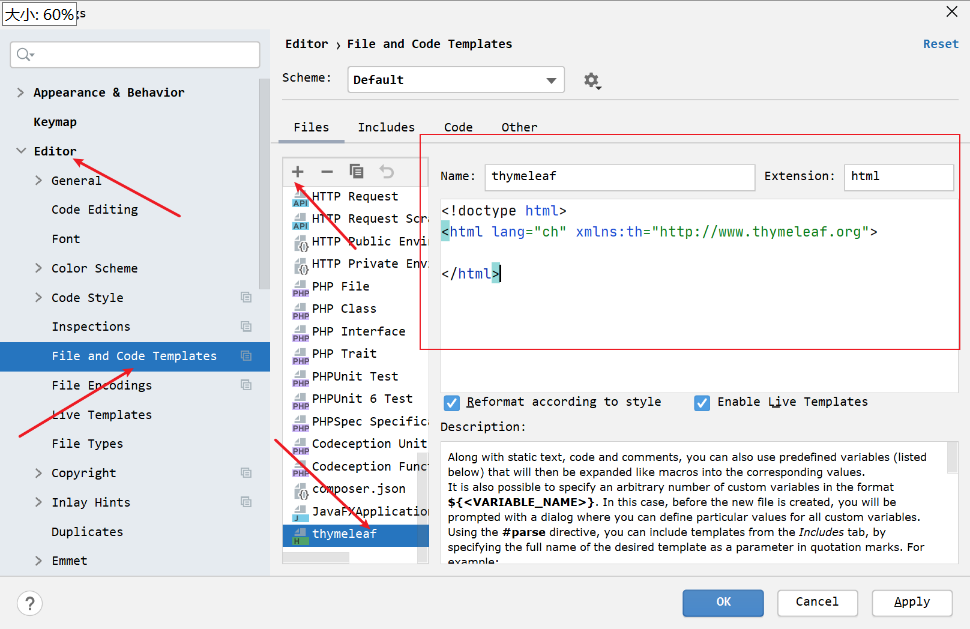
模板内容
<!doctype html>
<html lang="ch" xmlns:th="http://www.thymeleaf.org">

</html>
这样我们在文件夹鼠标右键就多了一个选择
3. Thymeleaf常用语法
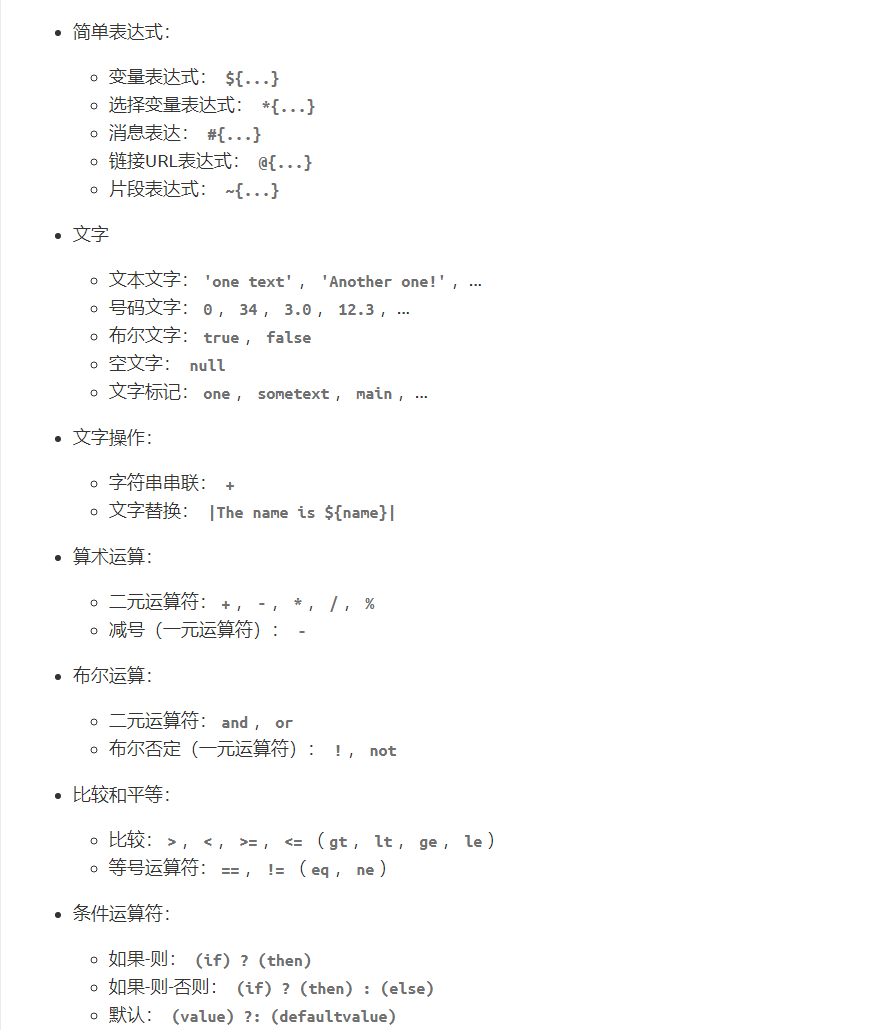
3.1 语法标记
3.2 th:text,th:content
th:text可以动态替换标签原本的内容
在templates创建页面index.html,${}里面可以写
<!doctype html>
<html lang="ch" xmlns:th="http://www.thymeleaf.org">
<head>
	<meta charset="UTF-8">
	<title th:text="${title}">默认的标题</title>
</head>
</html>写一个测试控制器IndexController
@Controller
public class IndexController {
    @GetMapping("/index")
    public String index(Model model) {
        model.addAttribute("title", "传递的标题");
        return "index";
    }
}此时如果我们直接打开index.html这个文件而不是通过SpringBoot的控制器去打开它
看下源代码,可以发现动态标签是没有渲染出来的,这就是动静分离
然后我们通过控制器打开http://localhost:8001/index,看看源码

同理我们使用th:content标签来渲染页面描述和页面关键字,这是在昨天的实战里面讲到过的
<head>
	<meta charset="UTF-8">
	<title th:text="${title}">默认的标题</title>
	<meta name="description" th:content="${description}">
	<meta name="keywords" th:content="${keywords}">
</head>@GetMapping("/index")
public String index(Model model) {
model.addAttribute("title", "传递的标题");
model.addAttribute("description", "传递的描述");
model.addAttribute("keywords", "传递的关键字");
return "index";
}假如我们的 th:text 标签里面需要拼接字符串${title}可以使用||来包裹
<title th:text="|lookroot-${title}|">默认的标题</title>3.3 支持渲染的属性
这类属性很多,每个属性都针对特定的HTML5属性:
th:abbr |
th:accept |
th:accept-charset |
|---|---|---|
th:accesskey |
th:action |
th:align |
th:alt |
th:archive |
th:audio |
th:autocomplete |
th:axis |
th:background |
th:bgcolor |
th:border |
th:cellpadding |
th:cellspacing |
th:challenge |
th:charset |
th:cite |
th:class |
th:classid |
th:codebase |
th:codetype |
th:cols |
th:colspan |
th:compact |
th:content |
th:contenteditable |
th:contextmenu |
th:data |
th:datetime |
th:dir |
th:draggable |
th:dropzone |
th:enctype |
th:for |
th:form |
th:formaction |
th:formenctype |
th:formmethod |
th:formtarget |
th:fragment |
th:frame |
th:frameborder |
th:headers |
th:height |
th:high |
th:href |
th:hreflang |
th:hspace |
th:http-equiv |
th:icon |
th:id |
th:inline |
th:keytype |
th:kind |
th:label |
th:lang |
th:list |
th:longdesc |
th:low |
th:manifest |
th:marginheight |
th:marginwidth |
th:max |
th:maxlength |
th:media |
th:method |
th:min |
th:name |
th:onabort |
th:onafterprint |
th:onbeforeprint |
th:onbeforeunload |
th:onblur |
th:oncanplay |
th:oncanplaythrough |
th:onchange |
th:onclick |
th:oncontextmenu |
th:ondblclick |
th:ondrag |
th:ondragend |
th:ondragenter |
th:ondragleave |
th:ondragover |
th:ondragstart |
th:ondrop |
th:ondurationchange |
th:onemptied |
th:onended |
th:onerror |
th:onfocus |
th:onformchange |
th:onforminput |
th:onhashchange |
th:oninput |
th:oninvalid |
th:onkeydown |
th:onkeypress |
th:onkeyup |
th:onload |
th:onloadeddata |
th:onloadedmetadata |
th:onloadstart |
th:onmessage |
th:onmousedown |
th:onmousemove |
th:onmouseout |
th:onmouseover |
th:onmouseup |
th:onmousewheel |
th:onoffline |
th:ononline |
th:onpause |
th:onplay |
th:onplaying |
th:onpopstate |
th:onprogress |
th:onratechange |
th:onreadystatechange |
th:onredo |
th:onreset |
th:onresize |
th:onscroll |
th:onseeked |
th:onseeking |
th:onselect |
th:onshow |
th:onstalled |
th:onstorage |
th:onsubmit |
th:onsuspend |
th:ontimeupdate |
th:onundo |
th:onunload |
th:onvolumechange |
th:onwaiting |
th:optimum |
th:pattern |
th:placeholder |
th:poster |
th:preload |
th:radiogroup |
th:rel |
th:rev |
th:rows |
th:rowspan |
th:rules |
th:sandbox |
th:scheme |
th:scope |
th:scrolling |
th:size |
th:sizes |
th:span |
th:spellcheck |
th:src |
th:srclang |
th:standby |
th:start |
th:step |
th:style |
th:summary |
th:tabindex |
th:target |
th:title |
th:type |
th:usemap |
th:value |
th:valuetype |
th:vspace |
th:width |
th:wrap |
th:xmlbase |
th:xmllang |
th:xmlspace |
th:async |
th:autofocus |
th:autoplay |
|---|---|---|
th:checked |
th:controls |
th:declare |
th:default |
th:defer |
th:disabled |
th:formnovalidate |
th:hidden |
th:ismap |
th:loop |
th:multiple |
th:novalidate |
th:nowrap |
th:open |
th:pubdate |
th:readonly |
th:required |
th:reversed |
th:scoped |
th:seamless |
th:selected |
3.4 渲染对象
创建一个基本对象UserVO
@Data
public class UserVO {
    private String username;
    private Integer age;
    private Integer sex;
    private Boolean isVip;
    private Date createTime;
    private List<String> tags;
}新建一个方法basic,将user对象传输到页面中
@GetMapping("/basicTrain")
public String basic(Model model) {
    UserVO userVO = new UserVO();
    userVO.setAge(21);
    userVO.setSex(1);
    userVO.setCreateTime(new Date());
    userVO.setTags(Arrays.asList("Java", "PHP", "Node"));
    userVO.setUsername("lookroot");
    model.addAttribute("user", userVO);
    return "basic";
}新建basic.html,此时如果我们想渲染User这个对象的信息我们可以这样
<div>
	<h2 th:text="${user.getUsername()}"></h2>
	<p th:text="${user.getAge()}"></p>
</div>也可以将User定义为临时变量,接着使用*{xxx}就能取到值了
<div th:object="${user}">
	<h2 th:text="*{username}"></h2>
	<p th:text="*{age}"></p>
</div>
还可以不使用get的方式,直接使用属性名
<h2 th:text="${user.username}" ></h2>3.5 th:if
th:if通过布尔值决定这个元素是否渲染
比如:
<p th:if="${user.isVip}">会员</p>3.6 th:each
th:each可以迭代循环出数据,前面我们User对象里面的tags是一个数组,我们来渲染一下
<ul>
   <li th:each="tag:${user.getTags()}"
       th:text="${tag}"></li>
</ul>状态变量在th:each属性中定义,并且包含以下数据:
-
当前的迭代索引,从0开始。这是
index属性。 -
从1开始的当前迭代索引。这是
count属性。 -
迭代变量中元素的总数。这是
size财产。 -
每次迭代的iter变量。这是
current财产。 -
当前迭代是偶数还是奇数。这些是
even/odd布尔属性。 -
当前迭代是否是第一个。这是
first布尔属性。 -
当前迭代是否为最后一次。这是
last布尔属性。
3.7 th:switch
th:switch选择语句
<div th:switch="${user.getSex()}">
	<p th:case="'1'">男</p>
	<p th:case="'2'">女</p>
	<p th:case="*">默认</p>
</div>
3.8 url
如果在springboot中需要引入static目录下的静态资源可以使用@{xxx}的方式
<link th:href="@{/app.css}" rel="stylesheet">3.9 JavaScript动态渲染
<script th:inline="javascript">
    const user = /*[[${user}]]*/ {};
    console.log(user);
</script>
同理css也是可以的
<style th:inline="css">
    .main\ elems {
      text-align: /*[[${align}]]*/ left;
    }
</style>
4. 碎片(组件)
日常开发中呢我们经常将有些可以复用的部分抽离出来
新建一个component.html,一个文件里面可以写多个碎片,使用th:fragment来定义
<footer th:fragment="com1">
	this is com1
</footer>

<footer id="com2">
this is com2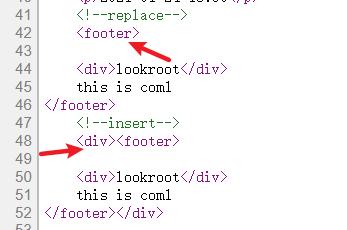
</footer>使用碎片主要有两种方式replace和insert,在index.html中编写
<!--replace-->
<div th:replace="~{component::com1}"></div>
<!--insert-->
<div th:insert="~{component::com1}"></div>这两种方式的区别就是,replace会将新标签完全替换原本的标签,也就是说原本写th:replace属性的标签就不会渲染出来,insert是往这个地方插入标签
我们看下上面两种方式渲染出来的区别吧
4.1 直接通过选择器使用
对于碎片,甚至可以不定义,我们再次添加一个 碎片
<footer id="com2">
	this is com2
</footer>
然后使用它
<div th:insert="~{component::#com2}"></div>4.2 注释类型
在碎片里面,我们是可以使用控制传递的数据的,比如上面的User对象,但是开发工具在component.html页面中可能不能识别到User对象,我们可以打一个注释
<!--/*@thymesVar id="user" type="cn.lookroot.loop.thymeleafdemo.vo.UserVO"*/-->
<div th:text="${user.getUsername()}"></div>
4.3 组件传递参数
组件也是可以传递数据的
<div th:fragment="com3(message)">
	<p th:text="${message}"></p>
</div>
使用的时候
<div th:insert="~{component::com3('传递数据')}"></div>4.4 局部替换组件
我们使用一个组件的时候,想要局部替换掉这个组件里面的部分内容该怎么做呢?通过传递参数的方式传递一个组件过来,并把这个组件替换原本的一部分
<div th:fragment="com4(message)">
   <p th:replace="${message}">原本的message</p>
</div>
使用的时候
<div th:insert="~{component::com4(~{::#message})}">
	<p id="message">替换的message</p>
</div>
5. 基本对象
5.1 #ctx:上下文对象
${#ctx.request}
${#ctx.response}
${#ctx.session}
${#ctx.servletContext}
5.2 请求/会话属性
${session.xxx}
${application.xxx}
${#request.getAttribute('xxx')}
5.3 工具类
在thymeleaf里面是可以直接使用一些Java的函数的,并且你可以通过传递参数的方式把一些自己写的方法传递给页面,在里面调用也是可以的
一些可以直接的使用函数
-
#dates
-
#calendars
-
#strings
-
#numbers
-
#objects
-
#bools
-
#arrays
-
#lists
-
#sets
-
#maps
-
#aggregates
以日期格式化来举例
<!--日期格式化-->
<p th:text="${#dates.format(user.createTime,'yyyy-MM-dd HH:mm')}"></p>
补充1 thymeleaf-layout-dialect
thymeleaf-layout-dialect 拓展可用来实现模板复用和设计布局,和上面的碎片差不多,这个更好用。
比如我们的页面的头 尾 基本都一样,不同页面只需要替换中间的body,就可以使用这个方式。
导入依赖
<dependency>
    <groupId>nz.net.ultraq.thymeleaf</groupId>
    <artifactId>thymeleaf-layout-dialect</artifactId>
    <version>3.2.0</version>
</dependency>
配置bean
@Bean
    public LayoutDialect layoutDialect() {
        return new LayoutDialect();
    }
创建基础模板 layout.html
<!DOCTYPE html>
<html lang="zh-cn" xmlns:th="http://www.thymeleaf.org" xmlns:layout="http://www.ultraq.net.nz/thymeleaf/layout">
<head>
    <title >Title</title>
</head>
<body>
    <div layout:fragment="content">
        替换的区域
    </div>
</body>
</html>
然后在不同的页面中就可以使用这个模板了,比如 article.html
<!DOCTYPE html>
<html  xmlns:th="http://www.thymeleaf.org" xmlns:layout="http://www.ultraq.net.nz/thymeleaf/layout"
      layout:decorate="~{layout.html}">
<head>
    <title>xxx</title>
</head>
<body>
    <div layout:fragment="content">
        <p>这是article</p>
    </div>
</body>
</html>